World of Van helsing: Deathtrap is an excellent strategy game and a lot of fun but near towards the end of the game it starts to become less fun and more frustrating. This is due to how difficult some of the levels are in tier 4. Especially the last 3 levels: Necropolis, Wonded Crag and Inkheart. X35 Earthwalker himself has beaten every level in tier 4 and he will give his views and some advice and tips concerning the levels and what to do.
“The last 3 tier 4 levels defeated me at my first try. They all seemed overwhelming as the enemies literally end up swarming you. Almost any enemy you have faced already will be present and back for revenge. For them, revenge is a dish best served in numbers. By the time you unlock tier 4 levels, you should be at least level 50 by then. The higher your level, the more skill points you can spend on your skills. The skills you bring into these levels are essential. Skills that make your character a man/woman army are needed as you have to be able to handle the battlefield yourself or at least one section on the level by yourself. For example, as the Mercenary having the bash and frost ring abilities are essential and will save your life. I will talk about this as a mercenary character. So make sure to have trap boost, touch of death, frost ring and bash. As other character leaders you must have at least one trap enhancing skill and a heavy hitting skill for serious damage.”
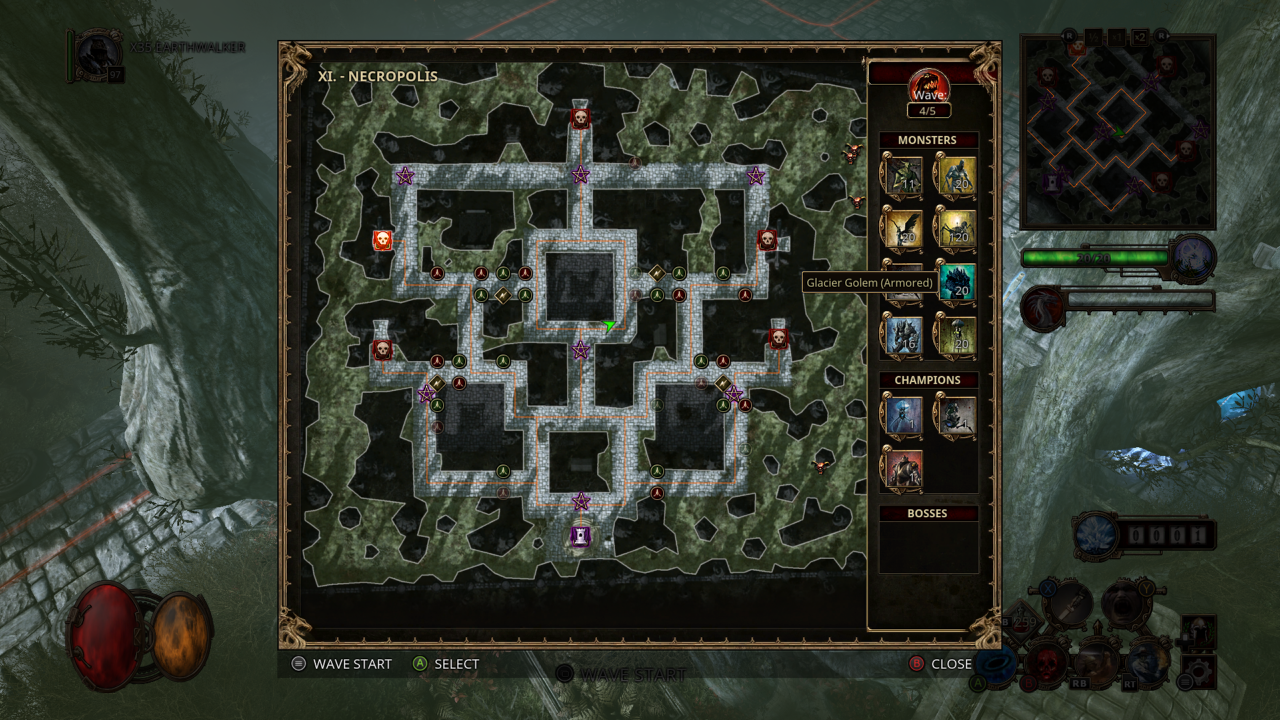
“The first tier 4 level that we will talk about is Necropolis, which looks like a giant cemetery (how fitting). This level is so hard simply because they through many different types of enemies your way. You will have to deal with horde, giant and armoured enemies. This means that splash, concentrated and piercing traps are needed. In the you should handle the giants that come from the top right gate by using ONLY concentrated traps. I used the gun sentry and frost pillar. This slows down the giants while dealing heavy concentrated damage. Make sure to max out the damage and slow for the gun sentry and frost pillars. Activate the top right and left enhancer beacons. Then built two razor launchers next to the top left gate as preparation for later waves. Lastly if you have some essence left, head to the top square section of the level and on the left hand side build a phoenix tower and blast furnace to handle horde enemies that come from the gate at the top gate. You must stay and handle the enemies from the top gate yourself. The next wave just upgrade your razor launchers on the top left path and along that path build lightning pillars build a razor launcher right in front of the enhancer beacon at the bottom left gate location. Handle the monsters from the top gate and only leave when you absolutely have have to. Keep an eye on the map so you can go and deal with the quag devourer champions that come at the end of the wave. Build concentrated traps along the path of the bottom right path for giants that come later. Wave 4 is the worst. The biggest threat are the glacier golem who will freeze you when they die if you are near. That’s why we built pure piercing traps on the left hand side as lots of armoured enemies will show up. Here you must know when to leave the top gate and assist in other places, primarily the glacier golems. It’s up to you now. If you can pass this wave then you can pass the final one. Just don’t panic and make sure to check your map often. I left a quick game play clip below to check out.”
“Wounded Crag is just simply a ridiculous tier 4 level as they it throws more enemies than your traps could ever handle. There is no fixed build for this level as the monsters change which gate they come from each wave pretty much. Good thing is that there are only two types of enemies here: Shredders and Drigiblusa (I hate those things). This means only build concentrated and piercing traps like the frost pillar and lightning pillar. Funny enough, this map only has tower traps slots anyway. You could use Enthropic tower but the giant enemies normally have quite the distance between them making the jump ability of the beam not effective. So that’s the main of it. You must build as much as possible and make sure to have slow and damage upgraded to max on all frost pillars. The lightning pillars need max extra charge and multi-jolt. Any slots that are too out of range for those two towers should be used for a olympus tower as has magnificent range. The strategy is to literally use as many trap slots as you can, building lighting and frost pillars, to damage as much as you can, weakening the enemy for when they encounter your character. Build as best as you can but in the end, it all comes down to your character and the skills you use. You have to manage this map and head everywhere to assist your traps literally. You could in the later waves sell to swap the locations of your piercing and concentrated traps but if you decide to do that then I recommend that you only do that once as towers sell for less of their original value after being used. Check that map frequently for sneaky monsters and always fight near teleporters so you can get to places quick to save the day. I failed to get three stars on this level at least twice, so don’t get discouraged even if you fail the level. See where you went wrong and then do what needs to be done. Hey, I never said that tier 4 levels are easy. So stop moaning and get good!”
“Inkheart is the true monster of this game. This level went over the scale in every way. You must deal with pretty much ever enemy you have faced already. Fast horde monsters, multiple armoured enemies including those glacier golems, giants in abundance, high damaging enemies, many inkwraiths (just in case you missed them) and multiple bosses all want to have a swing at your face. To beat this level, you have to use every trap slot and special trap available. This is non-negotiable. If you didn’t use one then you are dead. The scary part is that even if you use them all, you most likely will still be dead. It’s that hard. Even worse is that they don’t give you nearly enough essence to prepare for death. Your only hope is to use all the salvage recyclers which grants essences during attack waves. For the first wave build at least two salvage recyclers at the start. It’s up to your character to hold of the horde and build up essence. Then as the first wave continues build the other salvage recyclers. The trick for this level is to stall for time as long as possible so that you can get as much essence as possible. So let a lone monster walk as far as it can go. The last monster should be a quag devourer which are slow. So troll this monster as much as possible by running around it to dodge attacks and even take a few because while it attacks it stays still. Use your body if you have to, to buy time. Get hit to low health then run away to quickly heal and then go back and keep dodging attacks for as long as you can. Eventually the amount of essence you have will be well over a thousand! Then when you can no longer stall the creature, kill it.”
“Always get the service station special traps first then get the summoning traps. I suggest maxed out archer posts at the very most front to deal crazy damage then monster cages at the next line of traps, then right behind them more archers. Use the monster cages to shield and protect the archers. Monster cages once maxed out have extremely high health making them the best at stalling for time and holding back the horde. The archers must have maxed area damage and creature limit. On the floor with the line of summon trap slots just in front of the three paths to the gates we must protect, build a monster cage in front of archers. Again, you must use every slot and every special trap. EVERY SINGLE ONE! Off course having all monster cages might work for you or all archer posts. It comes down to your character and style. You may have to reset your leader and trap skills so that you can put as many stats as possible into your summon traps. As for leader skills I had maxed out sigil of inspiration, touch of death and battle roar as once combined with archers make the most powerful combination ever. Sigil grants bonus damage of over 500%, touch of death increases physical vulnerability to 112% while battle roar increases damage by 380%. That’s crazy damage. Crazy damage for a crazy level. I will run by groups of archers that many enemies are coming by and use sigl of inspiration and then head to my area to fight the horde. When a whole army is approaching you and the archers then use touch of death and battle roar and watch your enemies literally melt away. The last wave requires good timing and multi tasking skills. This last wave literally swarms you with numerous enemies all at once. Bosses, giants, hordes and more. It all comes down to you at that point. I trust that my advice has been useful.”
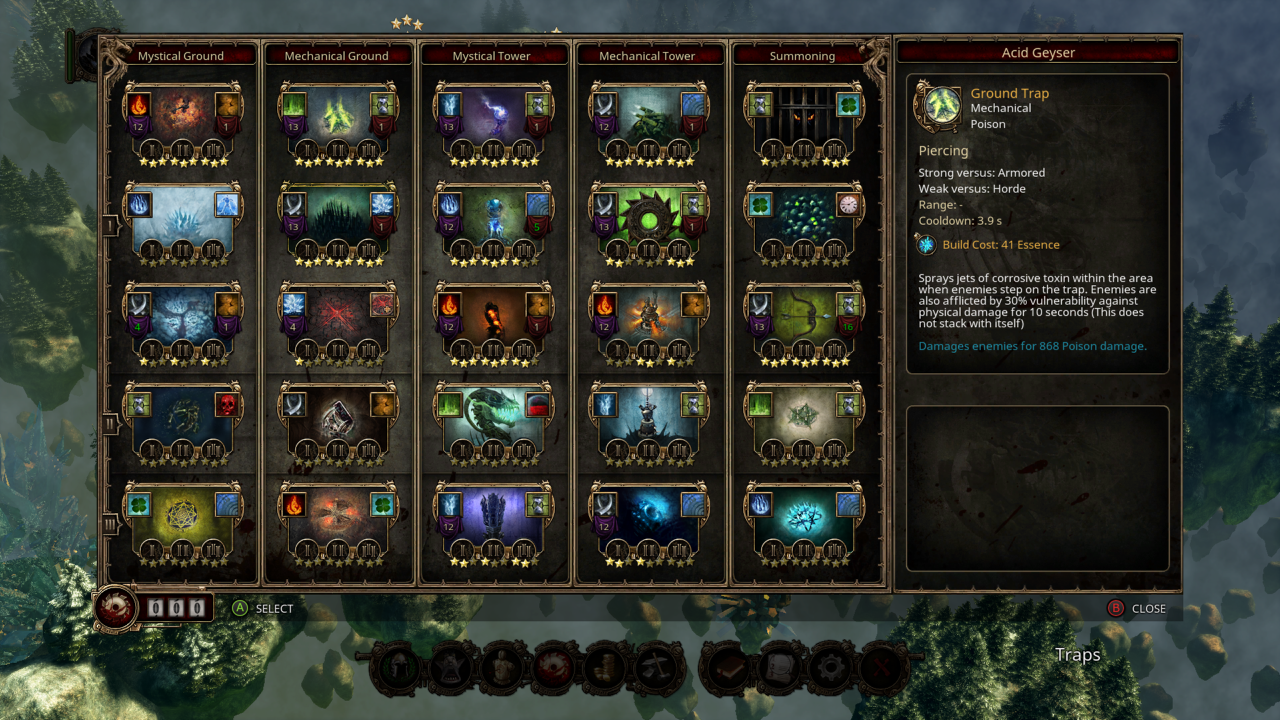
“Some of you might be wondering about my tower stats so I included a picture below”
Overall this will be one serious challenge for any gamer. The last three tier 4 levels are literally a step up from the others. You just have try. We at X35 Earthwalker personally think that the last level especially is too hard and ridiculous in what it throws at you but it can be done as others including X35 Earthwalker himself has done it so give it a try… also go try to do the ‘Earth Walk’!
For more information check out the link below: